Over the last several parts of this article series, I have talked a lot about the inner workings of the Active Directory. In this article, I want to switch gears and show you what all of this information has to do with running a network.
Windows Server 2003 comes with several different tools used for managing the Active Directory. The Active Directory management tool that you will use most often for day-to-day management tasks is the Active Directory Users and Computers console. As the name implies, this console is used to create, manage, and delete user and computer accounts.
You can access this console by clicking your server’s Start button and navigating through the Start menu to All Programs / Administrative Tools. The Active Directory Users and Computers option should be near the top of the Administrative Tools menu. Keep in mind that only domain controllers contain this option, so if you do not see the Active Directory Users and Computers command, make sure that you are logged into a domain controller.
Another thing that you might notice is that the Administrative Tools menu contains a couple of other Active Directory tools: Active Directory Domains and Trusts and Active Directory Sites and Services. I will be discussing these utilities in future articles.
When you open the Active Directory Users and Computers container, you will see a screen similar to the one that is shown in Figure A. As you might recall from previous articles in the series, the Active Directory is based on a forest, which contains one or more domains. Although the forest represents the entire Active Directory, the Active Directory Users and Computers console does not allow you to work with the Active Directory at the forest level. The Active Directory Users and Computers console is strictly a domain level tool. In fact, if you look at Figure A, you will notice that production.com is highlighted. Production.com is a domain on my network. All of the containers listed beneath the domain contain Active Directory objects that are specific to the domain.
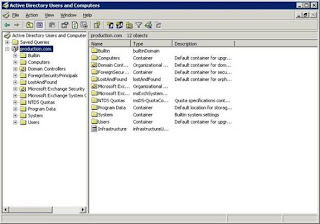 Figure A: The Active Directory Users and Computers console allows you to manage individual domains
You might have noticed that I said that production.com was one of the domains on my network, and yet none of my other domains are listed in Figure A. The Active Directory Users and Computers console only lists one domain at a time for the sake of keeping the console uncluttered. Remember when I said that the Active Directory Users and Computers console is only accessible from the Administrative Tools menu if you are logged into a domain controller? Well, the domain that is listed in the console corresponds to the domain controller that you are logged into. For example, in writing this article I logged in to one of the domain controllers for the production.com domain, so the Active Directory Users and Computers console connects to the production.com domain.
The problem with this is that domains are often geographically dispersed. For example, it is fairly common for large companies to have a different domain for each corporate office. If for instance you were in Miami, Florida and the company’s other domain represented an office in Las Vegas, Nevada it would not be practical to have to travel across the country every time you needed to manage the Las Vegas domain. Fortunately, you do not have to.
Although the Active Directory Users and Computers console defaults to displaying the domain that is associated with the domain controller that you are logged in to, you can use the console to display any domain that you have rights to. All you have to do is to right click on the domain that is being displayed and then select the Connect to Domain command from the resulting shortcut menu. Doing so displays a screen that allows you to either type in the name of the domain that you want to connect to, or to click a Browse button and browse for the domain.
Just as a domain might be located far away, you might also find it impractical to log directly in to a domain controller. For example I have worked in several offices in which domain controllers were located in a separate building or too far across the facility that I was in to make logging in to a domain controller impractical for day to day maintenance.
The good news is that you do not have to be logged in to a domain controller to access the Active Directory Users and Computers console. You only have to be logged in to a domain controller to access the Active Directory Users and Computers console from the Administrative Tools menu. You can access the Active Directory Users and Computers console from a member server by manually loading it into the Microsoft Management Console.
To do so, enter the MMC command at the server’s Run prompt. When you do that, the server will open an empty Microsoft Management Console. Next, select the Add / Remove Snap-In command from the console’s File menu. Windows will now open the Add / Remove Snap-In properties sheet. Click the Add button found on the properties sheet’s Standalone tab and you will see a list of all of the available snap-ins. Select the Active Directory Users and Computers option from the list of snap-ins and click the Add button, followed by the Close and OK buttons. The console will now be loaded.
In some situations loading the console in this way may produce an error. If you receive an error and the console does not allow you to manage the domain then right click on the Active Directory Users and Computers container and select the Connect to Domain Controller command from the resulting shortcut menu. This will give you the chance to connect the console to a specific domain controller without actually having to log in to that domain controller. Doing so will allow you to manage the domain as if you were sitting at the domain controller’s console.
That technique works great if you have a server at your disposal, but what happens if your workstation is running Windows Vista, and all of the servers are on the other side of the building?
One of the easiest solutions to this problem is to establish an RDP session with one of your servers. RDP is the Remote Desktop Protocol. It allows you to remotely control servers in your organization. In a Windows Server 2003 environment, you can enable a remote session by right clicking on My Computer and selecting the Properties command from the resulting shortcut menu. Upon doing so, you will see the System Properties sheet. Now, go to the Remote tab and select the Enable Remote Desktop on this Computer check box, as shown in Figure B.
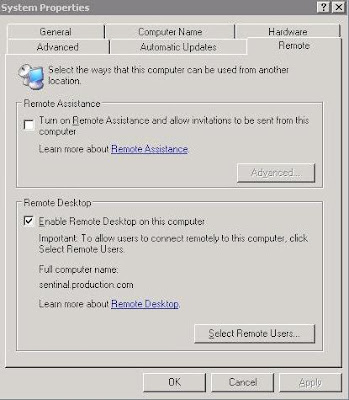
Figure B: You can configure a server to support Remote Desktop connections
To connect to the server from Windows Vista, select the Remote Desktop Connection command from the All Programs / Accessories menu. When you do, you will see a screen similar to the one that is shown in Figure C. Now, just enter the name of your server and click the Connect button to establish a remote control session
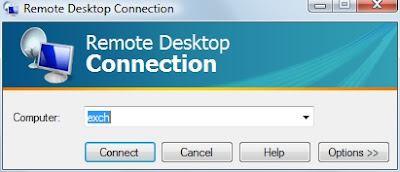
Figure C: Windows Vista makes it easy to connect to a remote server.
User Account Management
How to create a user account and some basic user account management techniques.
One of the most common uses for the Active Directory Users in Computers console is to create new user accounts. To do so, expand the container corresponding to the domain that you are attached to, and select the Users container. When you do, the console's details pane will display all of the user accounts that currently exist in the domain, as shown in Figure A.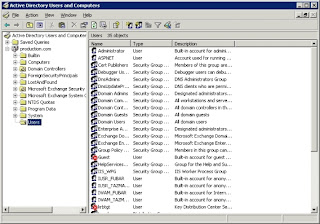
Figure A: Selecting the Users container causes the console to display all of the user accounts in the domain.
Now, right click on the Users container and select the New command from the resulting shortcut menu. When you do, you will see a submenu that gives you the choice of many different types of objects that you can create. Technically, the Users container is just a container and you can put pretty much any type of object in it. It is generally considered bad practice though to store objects other than user objects in the Users container. That being the case, select the User command from the submenu. When you do, you will see the dialog box shown in Figure B
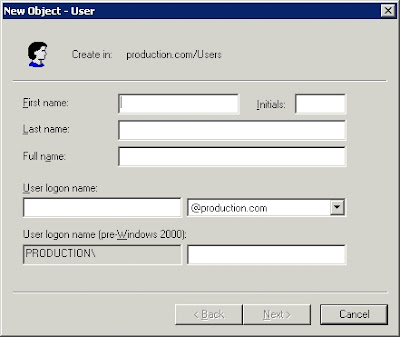
Figure B: The New Object – User dialog box allows you to create a new user account
As you can see in the figure, Windows initially only requires you to enter some very basic information about the user. Although this screen asks for things like first name and last name, these are not technically required. The only piece of information that is absolutely required is the User Logon Name. Although the other fields are optional, I recommend filling them in anyway.
The reason why I recommend filling in as many fields as you can is because a user account is nothing more than an object that will reside within the Active Directory. Things like first name and last name are attributes of the user object that you are creating. The more attribute information that you fill in, the more useful the information stored in the Active Directory will be. After all, the Active Directory is a database that you can query for information. In fact, many applications work by extracting the various attributes from the Active Directory. When you have filled in the various fields, click the Next button, and you will be taken to the screen shown in Figure C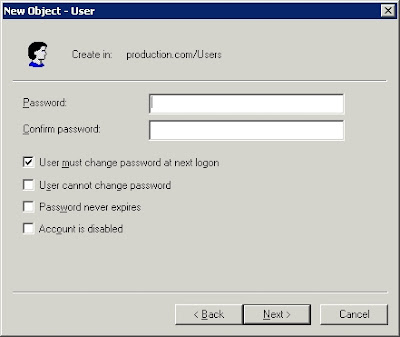
Figure C: You will be prompted to assign a password to the new user account.
As you can see in the figure, assigning a password is fairly simple. All you really have to do is type, and retype the password. By default, the user is required to change the password at the next logon. You can prevent this behavior by clearing the User Must Change Password at Next Logon check box. There is another check box allowing you to prevent the user from changing their password at all. You also have the option of setting passwords to never expire, or disabling the account completely.
Although there is nothing overly complex about the password screen, there is one important thing to keep in mind. When you assign a password to a new user account, the password must comply with your corporate security policy. If the password that you use does not meet the requirements dictated by the applicable group policies, then the user account will not be created.
Click next and you will see a screen displaying a summary of the options that you have chosen. Assuming that everything looks good, click Finish and the new user account will be created.
Editing User Account Attributes
Earlier, I discussed the importance of filling in the various attributes as you create a new user account. You might have noticed that the screens involved in creating a new user account did not really have many attributes that you were able to fill in. However, the Active Directory contains dozens of built in attributes related to user accounts.
I am not saying that you have to go through the console and populate dozens of attributes for every single user account. There are some attributes that do come in handy. I recommend populating attributes that are related to basic contact information. In fact, some corporations create corporate directories that are based solely on information stored in these Active Directory attributes. Even if you are not interested in building applications that extract information from your Active Directory, it is still a good idea to populate the Active Directory with user contact information. For example, suppose that you need to reboot a server, and a user is still logged into an application that resides on the server. If you have the user's contact information stored in the Active Directory, then you can simply look up the user's phone number, and call the user to ask them to log out.
Before I show you how to populate the various Active Directory attributes, I want to mention that the same technique can also be used for modifying existing attributes. For example, if a female employee were to get married, she might change her last name. You could use the techniques that I am about to show you to modify the contents of the Last Name attribute.
To access the various user account attributes, simply right click on the user account of choice and select the Properties command from the resulting shortcut menu. Upon doing so, Windows will display the screen shown in Figure D.
Figure D: The user's properties sheet is used to store attribute and configuration information for the user account.
As you can see in the figure, the properties sheet's General tab allows you to modify the user’s first name, last name, or display name. You can also fill in (or modify) a few other fields such as Description, Office, Telephone Number, E-mail, or Web Page. If you are interested in storing more detailed information about the user, then check out the Address, Telephones, and Organization tabs. These tabs all contain fields for storing much more detailed information about the user.
Resetting a User’s Password
You probably noticed in Figure D that there are a lot of different tabs on the user’s properties sheet. Most of these tabs are related to the security and configuration of the user account. One thing that most new administrators seem to notice right away when exploring these tabs is that there is no option on any of the tabs to reset the user’s password.
If you need to reset a user’s password, then close the user’s properties sheet. After doing so, right click on the user account and select the Reset Password command found on the resulting shortcut menu.
Creating Groups
This article continues the Networking for Beginners series by introducing the concept of security groups.I showed you how to use the Active Directory Users and Computers console to create and manage user accounts. In this article, I want to continue the discussion by teaching you about groups.
In a domain environment, user accounts are essential. A user account gives a user a unique identity on the network. This means that it is possible to track the user’s online activity. It is also possible to give a user account a unique set of permissions, assign the user a unique e-mail address, and meet all of the user’s other individual needs.
Although custom tailoring a user account to meet a user’s individual needs sounds like a good idea, it isn’t really practical in a lot of cases. Setting up and managing user accounts is a time consuming task. It isn’t a big deal if you’ve only got a couple dozen users in your organization, but if your organization has thousands of users, then account management can quickly become an overwhelming burden.
My advice is that even if you manage a very small network, you should treat the small network as if it were a big network. The reason for this is that you never know when the network will grow. Using good management techniques from the very beginning will help you to avoid a logistical nightmare later on.
I have actually seen the consequences of unexpected, rapid growth in the real world. About fifteen years ago, I was hired as a network administrator for an insurance company. At the time, the network was very small. There were only a couple dozen workstations attached to the network. The woman who was in charge of the network had no prior IT experience and was thrown to the wolves, so to speak. Not having an IT background, and not knowing any better, she had configured the network so that all of the configuration settings existed on a per user basis.
At the time, this was no big deal. There weren't many users, and it was easy to manage the various accounts and permissions. Within a year there were over two hundred PCs on the network. By the time I left the company a couple of years later, there were well over a thousand people using a network that was only initially designed to handle a few dozen.
As you can imagine, the network experienced some severe growing pains. Some of these growing pains were related to hardware performance, but most were related to the inability to effectively manage that many user accounts. Eventually, the network became such a mess that all of the user accounts had to be deleted and recreated from scratch.
Obviously, rapid unexpected growth can cause problems, but you are probably wondering why in the world things became so unmanageable that all of the accounts had to be deleted so that we could “just start over”.
As I mentioned before, all of the configuration and security settings were user based. This meant that if a department manager came to me and asked me to tell him who had access to a particular network resource, I would have to look at every account individually to see whether or not the user had access to the resource. When you only have a couple dozen users, checking every account to see which users have access to something is tedious and disruptive (at the time, checking took about 20 minutes). When you’ve got a couple hundred users checking every user account can take most of the day.
Granted, the events that I just described happened well over a decade ago. As the IT industry goes, these events might as well have occurred in prehistoric times. After all, the network operating systems that were in use at the time are now extinct. Even so, the lessons learned back then are as relevant today as they were then.
All of the problems that I just described could have been prevented if groups had been used. The basic idea behind groups is that a group can contain multiple user accounts. Since security settings are assigned at the group level, you should never manually assign permissions directly to a user account. Instead, you would assign permission to a group, and then make the user a member of the group.
I realize that this might sound a little confusing, so I will demonstrate the technique for you. Suppose that one of your file servers contains a folder named Data, and that you need to grant a user read access to the Data folder. Rather than assigning the permission directly to the user, let’s create a group.
To do so, open the Active Directory Users and Computers console. When the console opens, right click on the Users container, and select the New | Group commands from the resulting shortcut menus. Upon doing so, you will see a screen similar to the one that is shown in Figure A. At a minimum, you must assign a name to the group. For ease of management, let’s just call the group Data, since the group is going to be used to secure the Data folder. For right now, don’t worry about the group scope or the group type settings. I will teach you about these settings in the next part of this series.
Figure A: Enter a name for the group that you are creating
Click OK, and the Data group will be added to the list of users, as shown in Figure B. Notice that the group’s icon uses two heads, indicating that it is a group, as opposed to the single headed icon used for user accounts.
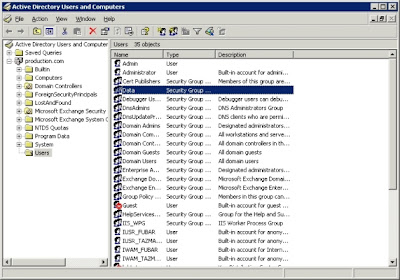
Figure B: The Data group is added to the list of users
Now, double click on the Data group, and you will see the group’s properties sheet. Select the properties sheet’s Members tab, and click the Add button. You are now free to add user accounts to the group. The accounts that you add are said to be group members. You can see what the Members tab looks like in Figure C.
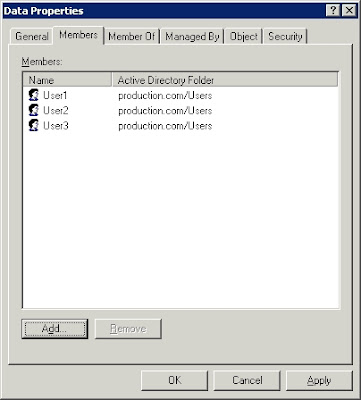
Figure C: The Members tab lists all of the group’s members
Now it’s time to put the group to work. To do so, right click on the Data folder, and select the Properties command from the resulting shortcut menu. When you do, you will see the folder’s properties sheet. Go to the properties sheet’s Security tab, and click the Add button. When prompted, enter the name of the group that you just created (Data) and click OK. You are now free to establish a set of permissions for the group. Whatever permissions you apply to the group, also apply to group members. As you can see in Figure D, there are some other rights that are applied to the folder by default. It is best to remove the Users group from the access control list to prevent any accidental contradictions of permissions.
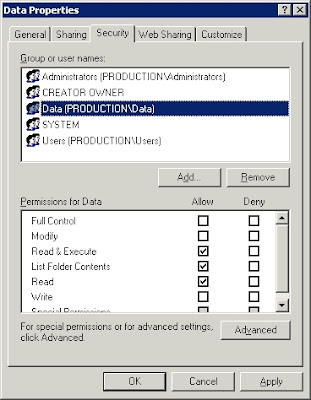
Figure D: The Data group is added to the folder’s access control list
Remember earlier when I mentioned how much work it was to try to figure out which users had access to a particular resource? Well, when groups are in use, the process becomes simple. If you need to know which users have access to the folder, just look to see which groups have access to the folder, as shown in Figure D. Once you know which groups can access the folder, determining who has rights to the folder is as simple as checking the group’s membership list (shown in Figure C). Any time additional users need access to the folder, just add their names to the list of group members. Likewise, you can remove permissions to the folder by deleting a user’s name from the list of group members.
Security Groups
The various types of security groups that Windows allows you to create.In the previous article, I showed you how to create security groups in Windows Server 2003. When I walked you through the process though, you might have noticed that Windows allows you to create a few different types of groups, as shown in Figure A. As you might have guessed, each of these group types has a specific purpose. In this article, I will explain what each type of group is used for.
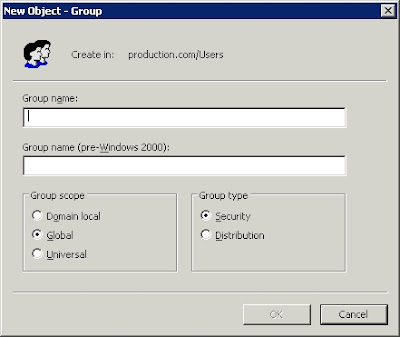
Figure A: Windows allows you to create a few different types of groups
f you look at the dialog box shown above, you will notice that the Group Scope area provides you with the option of creating a domain local, global, or universal group. There is also a fourth type of group that is not shown here, it is simply called a local group.
Local Groups
Local groups are groups that are specific to individual computer. As you know by now, local computers can contain user accounts that are completely separate from those accounts that belong to the domain that the computer is connected to. These are known as a local user accounts, and they are only accessible from the computer on which they reside. Furthermore, local user accounts can only exist on workstations and on member servers. Domain controllers do not allow for the existence of local user accounts.
With this in mind that should come as no surprise that local groups are simply groups that are specific to a particular member server or workstation. A local group is often used to manage local user accounts. For example, the local Administrators group allows you to designate which users are administrators over the local machine.
Although a local group can only be used to secure resources residing on the local machine, it doesn't mean that the group's membership must be limited to local users. While a local group can, and usually does, contain local users, it can also contain domain users. Furthermore, local groups can also contain other groups that reside at the domain level. For example, you could make a universal group a member of a local group, and the universal group’s members will basically become members of the local group. In fact, a local group can contain local users, domain users, domain local groups, global groups, and universal groups.
There are two caveats that you need to be aware of though. First, as you might have noticed, a local group cannot contain another local group. It would seem that you should be able to drop one group into another, but you can’t. Someone at Microsoft once told me that the reason for this is to prevent a situation in which two local groups become members of each other.
The other caveat that you need to be aware of is that local groups can only contain domain users and domain level groups if the machine containing the local group is a member of the domain. Otherwise, local groups can only contain local users.
Domain Local Groups
Given what you've just learned about local groups, the idea of a domain local group probably sounds contradictory. The reason why domain local groups exist though, is because domain controllers do not contain a local account database. This means that there are no such things as local users or local groups on a domain controller. Even so, domain controllers have local resources that need to be managed. This is where domain local groups come into play.
When you install Windows Server 2003 onto a computer, the machine typically begins life as either a standalone server or as a member server. In either case, local user accounts and local groups are created during the installation process. Now suppose that you wanted to convert the machine into a domain controller. When you run DCPROMO, the local groups and local user accounts are converted into domain local groups and domain user accounts.
It is important to keep in mind that all of the domain controllers within a domain share a common user account database. This means that if you add a user to a domain local group on one domain controller, the user will be a member of that domain local group on every domain controller in the entire domain.
The most important thing to keep in mind about domain local groups is that there are two different types. As I mentioned, when DCPROMO is run, the local groups are converted to domain local groups. Any domain local groups that are created by running DCPROMO are placed into the Builtin folder in the Active Directory Users and Computers console, as shown in Figure B.
Figure B: Domain local groups created by DCPROMO reside in the Builtin container
The reason why this is important to know is because there are some restrictions imposed on these particular domain local groups. These groups cannot be moved or deleted. Likewise, if you cannot make these groups members of other domain local groups.
These restrictions do not apply to domain local groups that you create though. Domain local groups that you create typically began life in the Users container. From there, you are free to move or delete them to your heart’s content.
I have to be perfectly frank and tell you though that in all the years I have been working with Windows Server, I have yet to find a good argument for creating domain local groups. In fact, domain local groups are basically identical to global groups, except that they are restricted to an individual domain.
Global Groups
Global groups are by far the most commonly used type of group. In most cases, a global group simply acts as a collection of Active Directory user accounts. The interesting thing about global groups is that they can be placed inside of each other. You can make one global group a member of another global group, so long as both global groups exist within the same domain.
Keep in mind, the global groups can only contain Active Directory resource. You cannot place a local user account or a local group into a global group. You can however, add a global group to a local group. In fact, doing so is the most common way of granting domain users permissions to resources stored on a local computer. For example, suppose that you wanted to give the managers in your company administrative rights to their workstations (not that I recommend doing that, this is just an example). To do so, you could create a global group called Managers, and place each of the manager’s domain user accounts into it. You could then add the Managers group to the workstation’s local Administrators group, thus making the managers administrators on those workstations.


1 comment:
Wow your tutorial so complete but complicated to. You have a lot of resource my friend, good!!!
Post a Comment