Showing posts with label Networking. Show all posts

Tuesday, February 19, 2008

Everything you need to know about IPv6

Once upon a time...

When the ARPANET was designed in the late 1960s, it was outfitted with a Network Control Protocol (NCP) that made it possible for the very different types of hosts connected to the network to talk with each other. However, it soon became clear that NCP was limiting in some ways, so work started on something better. The engineers decided that it made sense to split the monolithic NCP protocol into two parts: an Internet Protocol that allows packets to be routed between the different networks connected to the ARPANET, and a Transport Control Protocol that takes a data stream, splits it into segments and transmits the segments using the Internet Protocol. On the other side, the receiving Transport Control Protocol makes sure the segments are put together in the right order before they're delivered as a data stream to the receiving application. An important implication of this approach is that unlike, for instance, a phone connected to a wired or wireless phone network, a host connected to the ARPANET then and the Internet now must know its own address.

TCP/IP has served us well since it was born in 1981, but for some time now it has been clear that the IP part has a limitation that makes continued growth of the Internet for decades to come problematic. In order to accommodate a large number of hosts but not waste too much space in the IP packet on overhead, the TCP/IP designers settled on an address size of 32 bits. With 32 bits, it's possible to express 4,294,967,296 different values. Over half a billion of those are unusable as addresses for various reasons, giving us a total of 3.7 billion possible addresses for hosts on the Internet. As of January 1, 2007, 2.4 billion of those were in (some kind of) use. 1.3 billion were still available and about 170 million new addresses are given out each year. So at this rate, 7.5 years from now, we'll be clean out of IP addresses; faster if the number of addresses used per year goes up.


The feasibility of an open IPv4 market


This is usually when someone brings up NAT. Home routers (and a lot of enterprise equipment) use a technique called "network address translation" so that a single IP address can be shared by a larger number of hosts. The discussion usually goes like this:

"Use NAT, n00b. All 1337 of my Linux boxes share a single IP and it's safer, too!"

"NAT is not a firewall."

"NAT sucks."

"You suck."

So what about NAT?

Hosts behind a NAT device get addresses in the 10.0.0.0, 172.16.0.0, or 192.168.0.0 address blocks that have been set aside for private use in RFC 1918. The NAT device replaces the private address in packets sent by the hosts in the internal network with its own address, and the reverse for incoming packets. This way, multiple computers can share a single public address. However, NAT has several downsides. First of all, incoming connections don't work anymore, because when a session request comes in from the outside, the NAT device doesn't know which internal host this request should go to. This is largely solvable with port mappings and protocols like uPnP and NAT-PMP.

IPv4 address ranges
Class A: 1.0.0.1 to 126.255.255.254
Class B: 128.1.0.1 to 191.255.255.254
Class C: 192.0.1.1 to 223.225.254.254
Class D: 224.0.0.0 to 239.255.255.255 — reserved for multicast groups
Class E: 240.0.0.0 to 254.255.255.254 — reserved

Things get even trickier for applications that need referrals. NAT also breaks protocols that embed IP addresses. For instance, with VoIP, the client computer says to the server, "Please send incoming calls to this address." Obviously this doesn't work if the address in question is a private address. Working around this requires a significant amount of special case logic in the NAT device, the communication protocol, and/or the application. For this reason and a few others, most of the people who participate in the Internet Engineering Task Force (IETF) don't care much for NAT.

More to the point, NAT is already in wide use, and apparently we still need 170 million new IP addresses every year.

In the early days of the Internet, some organizations got excessively large address blocks. For instance, IBM, Xerox, HP, DEC, Apple and MIT all received "class A" address blocks of nearly 17 million addresses. (So HP, which acquired DEC, has more than 33 million addresses.) However, reclaiming those blocks would be a huge effort and only buy us a few more years: we currently burn through a class A block in five weeks. It's debatable how long we can make the IP address space last, especially as more and more devices, such as VoIP phones, become Internet-connected, but you can only keep squeezing the toothpaste tube for so long before it makes sense to buy a new one, even if the old one isn't technically empty. So in the early 1990s, the IETF started its "IP next generation" effort.

Larger addresses

The IPng project eventually resulted in IPv6 in 1995. In addition to the source and destination addresses and other housekeeping information, each IP packet contains a version number. For reasons lost in the mists of time, current IP packets have version number 4, and the first version number available for the new protocol was 6. So the old IP is now called IPv4, and the new IP IPv6. Apart from autoconfiguration and a lot of minor details that are best left to another article, IPv6 first and foremost sports larger addresses. Much larger addresses. 40 or 48 bits would have given us more than a trillion or even 281 trillion addresses, respectively, and 64 bits would have been a nice round number. But as the axiom goes, once bitten, twice shy, so the IETF opted for 128 bits this time around. The total number of possible addresses that this gives us:

340,282,366,920,938,463,463,374,607,431,768,211,456

To put this into perspective: there are currently 130 million people born each year. If this number of births remains the same until the sun goes dark in 5 billion years, and all of these people live to be 72 years old, they can all have 53 times the address space of the IPv4 Internet for every second of their lives. Let nobody accuse the IETF of being frugal this time around.

IPv4 addresses are written down by splitting them into four 8-bit values and putting periods between those, for instance, 192.0.2.31. IPv6 addresses on the other hand, are written down as eight 16-bit values with colons between them, and each 16-bit value is displayed in hexadecimal, i.e., using numbers and the letters A - F. For example, 2001:db8:31:1:20a:95ff:fef5:246e. It's not uncommon for IPv6 addresses to have a sequence of consecutive zeroes. In these cases, exactly one of those sequences can be left out. So 2001:db8:31:0:0:0:0:1 becomes 2001:db8:31::1 and the IPv6 loopback address 0:0:0:0:0:0:0:1 becomes ::1.

Stateless autoconfiguration


Although in most regards, IPv6 is still IP and works pretty much the same as IPv4, the new protocol departs from IPv4 in some ways. With IPv4, you need a DHCP server to tell you your address if you don't want to resort to manual configuration. This works very well if there's a single DHCP server, but not so much when there's more than one and they supply conflicting information. It can also be hard to get a system to have the same address across reboots with DHCP.

With IPv6, DHCP is largely unnecessary because of stateless autoconfiguration. This is a mechanism whereby routers send out "router advertisements" (RAs) that contain the upper 64 bits of an IPv6 address, and hosts generate the lower 64 bits themselves in order to form a complete address.

Traditionally, the bottom 64 bits of an IPv6 address are generated from a MAC address by flipping a bit and adding the bits ff:fe in the middle. So the Ethernet MAC address 00:0a:95:f5:24:6e results in 20a:95ff:fef5:246e as the lower 64 bits of an IPv6 address, called the "interface identifier" in IPv6 parlance. This way, if all the routers send out the same prefix for the upper 64 bits, the host will always configure the same IPv6 address for itself. No configuration is required, either on the host or a DHCP server. Alternatively, a host may generate its IPv6 address using a random number so its MAC address remains hidden from the rest of the Internet. Windows uses this type of addresses for outgoing sessions to aid privacy. Other operating systems can also generate these temporary addresses (a new one is generated every 24 hours) but don't do so by default.

When a router sends out several address prefixes, or several routers send out different address prefixes, hosts simply create addresses from each of those prefixes. Routers can make the hosts connected to them renumber their IPv6 addresses by removing the old prefix and advertising a new one. When done right, this is completely seamless.

Although the DHCPv6 protocol (the IPv6 version of DHCP) can give out IPv6 addresses the same way IPv4 DHCP servers give out IPv4 addresses, I haven't encountered any DHCPv6 servers or DHCPv6 clients that support this capability. With IPv6, DHCP is mostly used to distribute additional information, such as DNS server addresses, although there will be a way to do this through router advertisements as well soon, further diminishing the need for DHCP in IPv6.

Special address types

In addition to regular "global unicast" addresses as discussed on the previous page, IPv6 has several other types of addresses. I don't want to mention them all, but the three most important special purpose address types are:

Link local

Link local addresses are used to communicate over a single physical or logical subnetwork, such as an Ethernet. These addresses start with fe80 and are extensively used for IPv6's internal house keeping.

Site local

This is the IPv6 equivalent of the RFC 1918 private address space in IPv4. However, the IETF found the situation where different organizations use the same address space undesirable, so they created "unique site local" addresses where everyone takes a randomly selected block out of the IPv6 address space starting with fd.

Multicast

A multicast address is a group address, so every packet sent to a multicast address is received by all members of the group. Multicast addresses start with ff and can be used for applications where several hosts must receive the same information at the same time, such as live video broadcasts and also for autoconfiguration and discovery.

When running over Ethernet or WiFi, IPv4 hosts use broadcasts for discovery functions. For instance, in order to be able to send a packet over Ethernet, it's necessary to know the destination MAC address. So IPv4 simply broadcasts "who has 192.0.2.31?" to all systems on the network in question. IPv6, on the other hand, sends these packets to a multicast address, so only IPv6 hosts listening for these requests get to see them; on other systems the Ethernet hardware simply ignores the packets, and it's even possible for switches to filter them out by keeping track of the multicast groups hosts are listening on for each switch port.

IPv6 security

There is a lot of talk about how IPv6 is more secure than IPv4. This boils down to two things; one of them is real, the other isn't. The good news is that because the IPv6 address space is so large, randomly scanning for systems that are vulnerable is completely infeasible. The story goes that at the height of the self-propagating malware explosion a few years ago, an unpatched Windows system would be infected faster than it could download the necessary security updates. With IPv6, that is simply impossible: even with a billion infected hosts each scanning a billion IPv6 addresses per second, it takes more than a hundred million years to scan just the IPv6 address space that's given out to ISPs right now, which is about 0.01 percent of what's available. However, targeted scanning, although not easy, is still possible, so security measures like those used with IPv4 are still necessary.

The idea was to give IPv6 security a big push by making IPsec support mandatory. IPsec encrypts each individual packet, so it can be applied to all IP traffic, unlike the widely used SSL, which only works on top of TCP. However, for a number of reasons, it's very difficult to build IPsec support into applications, so it never gained much real-world use except as a mechanism to implement VPNs. And despite the fact that IPsec was developed for IPv6 or at least with IPv6 in mind, it also works with IPv4. All in all, IPsec can't be considered a security advantage for IPv6.

Let me reiterate a point I made earlier: a host that has IPv6 turned on will create a link local address for itself. This means that any host that has IPv6 enabled—out of the box for Windows Vista, Mac OS X, and most Linux and BSD distributions—is reachable over IPv6 for hosts connected to the same Ethernet, even if there's no IPv6 router sending out router advertisements. By monitoring IPv6 autoconfiguration traffic or by trying link local addresses created from MAC addresses seen in other types of traffic, it's not too difficult to find the addresses in question. An even easier method is sending out a multicast ping, and see what comes back. Windows blocks these, but BSD/Mac/Linux generally send back replies. The command line on these systems is:

ping6 -I interface-name ff02::1

Use the ifconfig command to find interface names. On systems where the IPv6 networking stack derives from the KAME implementation, such as the BSD family and MacOS, there are additional ping6 options that are even more helpful for nosy types. Type man ping6 to find out more.

With IPv4, there will generally be a NAT device that functions as a simple firewall by blocking incoming sessions (although there are ways to trick NATs into allowing them). Since there are more than enough public addresses to go around in IPv6, along with the dislike for NAT in IETF circles, there is almost never any NAT with IPv6, so no automatic protection against incoming sessions. This lack of automatic basic firewalling that comes with NAT is only the beginning, though. Many software firewalls that run on the to-be-firewalled host itself only support IPv4 and don't get in the way of IPv6 packets at all. The Windows and Mac OS built-in firewalls don't have this problem, but if you're doing any firewalling on Linux or BSD (or command line firewalling with Mac OS X), make sure that your services are firewalled over IPv6, too. On the BSD/Linux side, a good choice in this regard is the pf firewalling package, because unlike iptables, ipfw, or ipf, it supports both IPv4 and IPv6 and allows rules that apply to both. If you have a router or home gateway that supports IPv6, make sure that it, too, filters IPv6. A stateful filter that allows outgoing connections and return traffic, but not incoming connections closest to the IPv4 NAT filtering functionality.

Running IPv6

Although designing a new protocol isn't exactly trivial, the hard part is getting it deployed. Having to put an entire new infrastructure in place or flipping a switch from "IPv4" to "IPv6" for the current Internet aren't feasible. To avoid these issues as much as possible, the IETF came up with a number of transition techniques. The most important ones are dual stack and tunneling. Dual stack is nothing more than the notion that a host can run both IPv4 and IPv6 side by side, so it can talk to IPv4 hosts over IPv4 and to IPv6 hosts over IPv6. Tunneling means that when IPv6 packets must cross part of the network that only supports IPv4, the IPv6 packets are put inside IPv4 packets, transmitted across the IPv4-only part of the network, and then the IPv4 part is removed and the packets continue on their way over IPv6.

As mentioned earlier, most modern operating systems are set up for dual-stack operation by default. So if there's an IPv6 router on the local network that advertises an IPv6 prefix, a host will generate an IPv6 address for itself so it can talk to the IPv6 Internet. Now that Microsoft has enabled IPv6 by default in Vista (it can be turned on and off with ipv6 install and ipv6 uninstall in XP), we can probably expect more IPv6-enabled home routers like Apple's draft-802.11n Airport Extreme in the future.


Note that there's no requirement that your ISP supports the new protocol in order to use IPv6: an IPv6-enabled router or a host itself can use a tunnel to reach the IPv6 Internet. There are several tunneling techniques, but the most common ones are "manual" IPv6 in IP tunnels where the exact path of the tunneled IPv6 packets is set up through manual configuration, and 6to4 automatic tunneling. With 6to4, a host or router can create a range of IPv6 addresses from its IPv4 address. 6to4 addresses are easily recognizable because they always start with 2002. Because every 6to4-derived IPv6 address maps to an IPv4 address, it's easy for a system that understands 6to4 to tunnel the IPv6 packets to the right place over IPv4. Gateways make it possible for native IPv6 systems to communicate with 6to4 systems.

6to4 is easy to use because it doesn't require any configuration, and has the added bonus that it comes with built-in IPv6 address space. However, only public IPv4 addresses can be used for 6to4, so hosts behind NAT can't do 6to4 tunneling, and another limitation is the dependence on public gateways, which makes 6to4 slower and less reliable than other forms of IPv6 connectivity. If you're serious about IPv6, you'll want to set up a manual tunnel. If your ISP offers this service, that's the best choice to avoid unnecessary tunnel detours, but one of the many tunnel brokers is a good alternative.

Note that Windows Vista (and Windows XP with IPv6 enabled) have 6to4 enabled by default when the system has a public IPv4 address. The same is true for the new Airport Extreme, which will send out router advertisements with its 6to4 IPv6 address prefix so hosts connected to it will configure an IPv6 address and be tunneled over 6to4 by the router. 6to4 is also relatively easy to turn on with Mac OS X and BSD/Linux.

Systems with IPv6 connectivity (regardless of the type) decide whether to use IPv4 or IPv6 to reach a destination by consulting the DNS. Communication over the Internet requires addresses, but we generally work with domain names. The DNS takes care of the difference by having one or more A (address) records that contain an IPv4 address associated with a given name. If a system also has an IPv6 address, this is added to the DNS with an AAAA (quad-A) record. Hosts that only have IPv4 connectivity ignore the AAAA records, but dual stack hosts ask the DNS for both the A and AAAA records. They will then generally prefer to connect to a destination over IPv6 if possible, and use IPv4 if there's no AAAA record in the DNS or connecting over IPv6 doesn't work. Some applications and/or OSes always ask for AAAA records when IPv6 is turned on, which creates a problem with some (increasingly rare) buggy DNS servers that return an error after an AAAA query. In these cases, turning off IPv6 can make surfing the web a lot faster.

You can see if your computer has working IPv6 connectivity by connecting to www.kame.net or www.apnic.net. KAME is a Japanese project that built an IPv6 networking stack for BSD and Mac OS. Their mascot is a turtle, which dances if you connect over IPv6. APNIC is responsible for giving out IP addresses in the Asia-Pacific region, and their web site will tell you your IP address (IPv4 or IPv6) in the top left corner of the page. Internet Explorer under Windows, Safari on Mac OS X 10.4, and Firefox under Windows, Linux and BSD will use IPv6 when available on the system, but Firefox on the Mac has IPv6 turned off in about:config.

IPv6 and the future of home networking

Although stateless autoconfig works very differently from DHCP, in practice IPv6 works much the same as IPv4 in a home network: computers and other devices automatically get an address from a router, modem or gateway so they can connect to the 'Net without manual intervention. Firewalling is a bit different, because with IPv4, most people don't have the option to keep their network completely open.

When IPv6 takes off, we'll probably see a new class of home firewall products that allow more granular blocking of services and devices in a home IPv6 network than either block incoming sessions or allow everything, like we have in today's first IPv6 home routers. The abundance of address space also makes it possible to have separate subnetworks for different purposes, which will be helpful as more and more devices connect to the network. And we still have a lot to look forward to: the IETF is currently working on mobility and multihoming extensions to IPv6. Mobility means moving from one network to another while keeping the same IP address. So a VoIP call could start on your home network, continue over wireless service and then finish at work. Multihoming means connecting to more than one ISP at the same time, so that when one fails, communication sessions automatically move over to the other.

Moral of the story

Although IPv6 is taking its sweet time to conquer the world, it's now showing up in more and more places, so you may actually run into it one of these days. If you're working on security, keep your eye out for IPv6 because if overlooked, IPv6 could allow things that are blocked over IPv4. And if you're buying expensive equipment, you may want to make sure that if it doesn't do IPv6 today, it's at least upgradable, so you can still use your gear if IPv6 picks up more quickly than expected as IPv4 addresses run out. And it never hurts to experiment a bit with the new protocol so you know how it works by the time you need it.

Thursday, December 13, 2007

Networking Basics: Part 4

The Active Directory Users and Computers Console

Over the last several parts of this article series, I have talked a lot about the inner workings of the Active Directory. In this article, I want to switch gears and show you what all of this information has to do with running a network.

Windows Server 2003 comes with several different tools used for managing the Active Directory. The Active Directory management tool that you will use most often for day-to-day management tasks is the Active Directory Users and Computers console. As the name implies, this console is used to create, manage, and delete user and computer accounts.

You can access this console by clicking your server’s Start button and navigating through the Start menu to All Programs / Administrative Tools. The Active Directory Users and Computers option should be near the top of the Administrative Tools menu. Keep in mind that only domain controllers contain this option, so if you do not see the Active Directory Users and Computers command, make sure that you are logged into a domain controller.

Another thing that you might notice is that the Administrative Tools menu contains a couple of other Active Directory tools: Active Directory Domains and Trusts and Active Directory Sites and Services. I will be discussing these utilities in future articles.

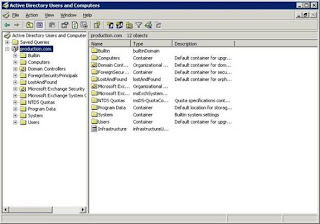
When you open the Active Directory Users and Computers container, you will see a screen similar to the one that is shown in Figure A. As you might recall from previous articles in the series, the Active Directory is based on a forest, which contains one or more domains. Although the forest represents the entire Active Directory, the Active Directory Users and Computers console does not allow you to work with the Active Directory at the forest level. The Active Directory Users and Computers console is strictly a domain level tool. In fact, if you look at Figure A, you will notice that production.com is highlighted. Production.com is a domain on my network. All of the containers listed beneath the domain contain Active Directory objects that are specific to the domain.


Figure A: The Active Directory Users and Computers console allows you to manage individual domains

You might have noticed that I said that production.com was one of the domains on my network, and yet none of my other domains are listed in Figure A. The Active Directory Users and Computers console only lists one domain at a time for the sake of keeping the console uncluttered. Remember when I said that the Active Directory Users and Computers console is only accessible from the Administrative Tools menu if you are logged into a domain controller? Well, the domain that is listed in the console corresponds to the domain controller that you are logged into. For example, in writing this article I logged in to one of the domain controllers for the production.com domain, so the Active Directory Users and Computers console connects to the production.com domain.

The problem with this is that domains are often geographically dispersed. For example, it is fairly common for large companies to have a different domain for each corporate office. If for instance you were in Miami, Florida and the company’s other domain represented an office in Las Vegas, Nevada it would not be practical to have to travel across the country every time you needed to manage the Las Vegas domain. Fortunately, you do not have to.

Although the Active Directory Users and Computers console defaults to displaying the domain that is associated with the domain controller that you are logged in to, you can use the console to display any domain that you have rights to. All you have to do is to right click on the domain that is being displayed and then select the Connect to Domain command from the resulting shortcut menu. Doing so displays a screen that allows you to either type in the name of the domain that you want to connect to, or to click a Browse button and browse for the domain.

Just as a domain might be located far away, you might also find it impractical to log directly in to a domain controller. For example I have worked in several offices in which domain controllers were located in a separate building or too far across the facility that I was in to make logging in to a domain controller impractical for day to day maintenance.

The good news is that you do not have to be logged in to a domain controller to access the Active Directory Users and Computers console. You only have to be logged in to a domain controller to access the Active Directory Users and Computers console from the Administrative Tools menu. You can access the Active Directory Users and Computers console from a member server by manually loading it into the Microsoft Management Console.

To do so, enter the MMC command at the server’s Run prompt. When you do that, the server will open an empty Microsoft Management Console. Next, select the Add / Remove Snap-In command from the console’s File menu. Windows will now open the Add / Remove Snap-In properties sheet. Click the Add button found on the properties sheet’s Standalone tab and you will see a list of all of the available snap-ins. Select the Active Directory Users and Computers option from the list of snap-ins and click the Add button, followed by the Close and OK buttons. The console will now be loaded.

In some situations loading the console in this way may produce an error. If you receive an error and the console does not allow you to manage the domain then right click on the Active Directory Users and Computers container and select the Connect to Domain Controller command from the resulting shortcut menu. This will give you the chance to connect the console to a specific domain controller without actually having to log in to that domain controller. Doing so will allow you to manage the domain as if you were sitting at the domain controller’s console.

That technique works great if you have a server at your disposal, but what happens if your workstation is running Windows Vista, and all of the servers are on the other side of the building?

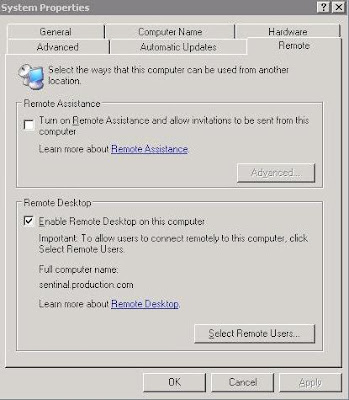
One of the easiest solutions to this problem is to establish an RDP session with one of your servers. RDP is the Remote Desktop Protocol. It allows you to remotely control servers in your organization. In a Windows Server 2003 environment, you can enable a remote session by right clicking on My Computer and selecting the Properties command from the resulting shortcut menu. Upon doing so, you will see the System Properties sheet. Now, go to the Remote tab and select the Enable Remote Desktop on this Computer check box, as shown in Figure B.


Figure B: You can configure a server to support Remote Desktop connections

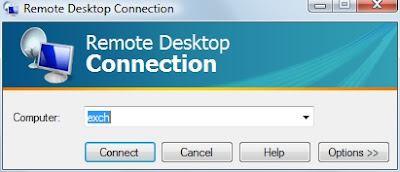
To connect to the server from Windows Vista, select the Remote Desktop Connection command from the All Programs / Accessories menu. When you do, you will see a screen similar to the one that is shown in Figure C. Now, just enter the name of your server and click the Connect button to establish a remote control session


Figure C: Windows Vista makes it easy to connect to a remote server.

User Account Management

How to create a user account and some basic user account management techniques.

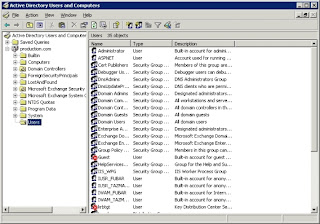
One of the most common uses for the Active Directory Users in Computers console is to create new user accounts. To do so, expand the container corresponding to the domain that you are attached to, and select the Users container. When you do, the console's details pane will display all of the user accounts that currently exist in the domain, as shown in Figure A.


Figure A: Selecting the Users container causes the console to display all of the user accounts in the domain.

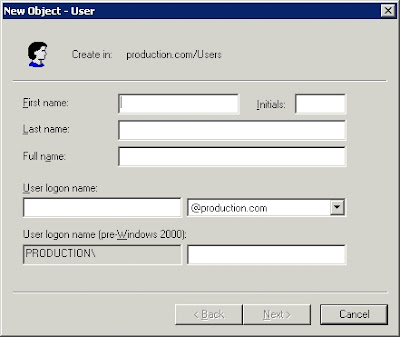
Now, right click on the Users container and select the New command from the resulting shortcut menu. When you do, you will see a submenu that gives you the choice of many different types of objects that you can create. Technically, the Users container is just a container and you can put pretty much any type of object in it. It is generally considered bad practice though to store objects other than user objects in the Users container. That being the case, select the User command from the submenu. When you do, you will see the dialog box shown in Figure B


Figure B: The New Object – User dialog box allows you to create a new user account

As you can see in the figure, Windows initially only requires you to enter some very basic information about the user. Although this screen asks for things like first name and last name, these are not technically required. The only piece of information that is absolutely required is the User Logon Name. Although the other fields are optional, I recommend filling them in anyway.

The reason why I recommend filling in as many fields as you can is because a user account is nothing more than an object that will reside within the Active Directory. Things like first name and last name are attributes of the user object that you are creating. The more attribute information that you fill in, the more useful the information stored in the Active Directory will be. After all, the Active Directory is a database that you can query for information. In fact, many applications work by extracting the various attributes from the Active Directory. When you have filled in the various fields, click the Next button, and you will be taken to the screen shown in Figure C


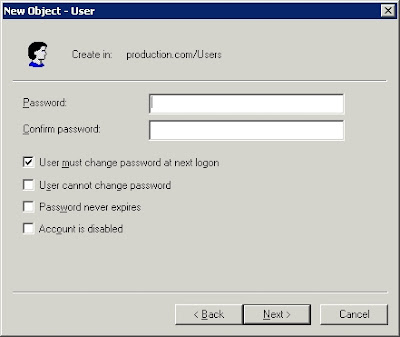
Figure C: You will be prompted to assign a password to the new user account.

As you can see in the figure, assigning a password is fairly simple. All you really have to do is type, and retype the password. By default, the user is required to change the password at the next logon. You can prevent this behavior by clearing the User Must Change Password at Next Logon check box. There is another check box allowing you to prevent the user from changing their password at all. You also have the option of setting passwords to never expire, or disabling the account completely.

Although there is nothing overly complex about the password screen, there is one important thing to keep in mind. When you assign a password to a new user account, the password must comply with your corporate security policy. If the password that you use does not meet the requirements dictated by the applicable group policies, then the user account will not be created.

Click next and you will see a screen displaying a summary of the options that you have chosen. Assuming that everything looks good, click Finish and the new user account will be created.

Editing User Account Attributes

Earlier, I discussed the importance of filling in the various attributes as you create a new user account. You might have noticed that the screens involved in creating a new user account did not really have many attributes that you were able to fill in. However, the Active Directory contains dozens of built in attributes related to user accounts.

I am not saying that you have to go through the console and populate dozens of attributes for every single user account. There are some attributes that do come in handy. I recommend populating attributes that are related to basic contact information. In fact, some corporations create corporate directories that are based solely on information stored in these Active Directory attributes. Even if you are not interested in building applications that extract information from your Active Directory, it is still a good idea to populate the Active Directory with user contact information. For example, suppose that you need to reboot a server, and a user is still logged into an application that resides on the server. If you have the user's contact information stored in the Active Directory, then you can simply look up the user's phone number, and call the user to ask them to log out.

Before I show you how to populate the various Active Directory attributes, I want to mention that the same technique can also be used for modifying existing attributes. For example, if a female employee were to get married, she might change her last name. You could use the techniques that I am about to show you to modify the contents of the Last Name attribute.

To access the various user account attributes, simply right click on the user account of choice and select the Properties command from the resulting shortcut menu. Upon doing so, Windows will display the screen shown in Figure D.


Figure D: The user's properties sheet is used to store attribute and configuration information for the user account.


As you can see in the figure, the properties sheet's General tab allows you to modify the user’s first name, last name, or display name. You can also fill in (or modify) a few other fields such as Description, Office, Telephone Number, E-mail, or Web Page. If you are interested in storing more detailed information about the user, then check out the Address, Telephones, and Organization tabs. These tabs all contain fields for storing much more detailed information about the user.

Resetting a User’s Password

You probably noticed in Figure D that there are a lot of different tabs on the user’s properties sheet. Most of these tabs are related to the security and configuration of the user account. One thing that most new administrators seem to notice right away when exploring these tabs is that there is no option on any of the tabs to reset the user’s password.

If you need to reset a user’s password, then close the user’s properties sheet. After doing so, right click on the user account and select the Reset Password command found on the resulting shortcut menu.

Creating Groups

This article continues the Networking for Beginners series by introducing the concept of security groups.

I showed you how to use the Active Directory Users and Computers console to create and manage user accounts. In this article, I want to continue the discussion by teaching you about groups.

In a domain environment, user accounts are essential. A user account gives a user a unique identity on the network. This means that it is possible to track the user’s online activity. It is also possible to give a user account a unique set of permissions, assign the user a unique e-mail address, and meet all of the user’s other individual needs.

Although custom tailoring a user account to meet a user’s individual needs sounds like a good idea, it isn’t really practical in a lot of cases. Setting up and managing user accounts is a time consuming task. It isn’t a big deal if you’ve only got a couple dozen users in your organization, but if your organization has thousands of users, then account management can quickly become an overwhelming burden.

My advice is that even if you manage a very small network, you should treat the small network as if it were a big network. The reason for this is that you never know when the network will grow. Using good management techniques from the very beginning will help you to avoid a logistical nightmare later on.

I have actually seen the consequences of unexpected, rapid growth in the real world. About fifteen years ago, I was hired as a network administrator for an insurance company. At the time, the network was very small. There were only a couple dozen workstations attached to the network. The woman who was in charge of the network had no prior IT experience and was thrown to the wolves, so to speak. Not having an IT background, and not knowing any better, she had configured the network so that all of the configuration settings existed on a per user basis.

At the time, this was no big deal. There weren't many users, and it was easy to manage the various accounts and permissions. Within a year there were over two hundred PCs on the network. By the time I left the company a couple of years later, there were well over a thousand people using a network that was only initially designed to handle a few dozen.

As you can imagine, the network experienced some severe growing pains. Some of these growing pains were related to hardware performance, but most were related to the inability to effectively manage that many user accounts. Eventually, the network became such a mess that all of the user accounts had to be deleted and recreated from scratch.

Obviously, rapid unexpected growth can cause problems, but you are probably wondering why in the world things became so unmanageable that all of the accounts had to be deleted so that we could “just start over”.

As I mentioned before, all of the configuration and security settings were user based. This meant that if a department manager came to me and asked me to tell him who had access to a particular network resource, I would have to look at every account individually to see whether or not the user had access to the resource. When you only have a couple dozen users, checking every account to see which users have access to something is tedious and disruptive (at the time, checking took about 20 minutes). When you’ve got a couple hundred users checking every user account can take most of the day.

Granted, the events that I just described happened well over a decade ago. As the IT industry goes, these events might as well have occurred in prehistoric times. After all, the network operating systems that were in use at the time are now extinct. Even so, the lessons learned back then are as relevant today as they were then.

All of the problems that I just described could have been prevented if groups had been used. The basic idea behind groups is that a group can contain multiple user accounts. Since security settings are assigned at the group level, you should never manually assign permissions directly to a user account. Instead, you would assign permission to a group, and then make the user a member of the group.

I realize that this might sound a little confusing, so I will demonstrate the technique for you. Suppose that one of your file servers contains a folder named Data, and that you need to grant a user read access to the Data folder. Rather than assigning the permission directly to the user, let’s create a group.

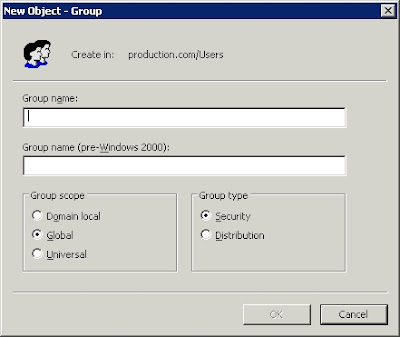
To do so, open the Active Directory Users and Computers console. When the console opens, right click on the Users container, and select the New | Group commands from the resulting shortcut menus. Upon doing so, you will see a screen similar to the one that is shown in Figure A. At a minimum, you must assign a name to the group. For ease of management, let’s just call the group Data, since the group is going to be used to secure the Data folder. For right now, don’t worry about the group scope or the group type settings. I will teach you about these settings in the next part of this series.


Figure A: Enter a name for the group that you are creating

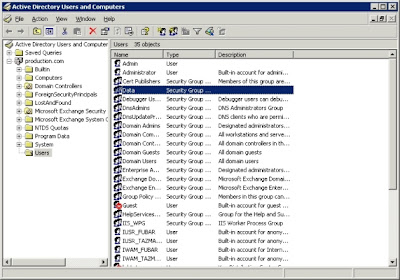
Click OK, and the Data group will be added to the list of users, as shown in Figure B. Notice that the group’s icon uses two heads, indicating that it is a group, as opposed to the single headed icon used for user accounts.


Figure B: The Data group is added to the list of users

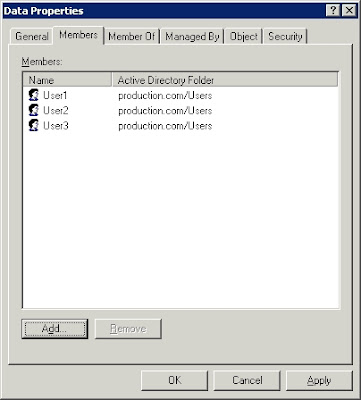
Now, double click on the Data group, and you will see the group’s properties sheet. Select the properties sheet’s Members tab, and click the Add button. You are now free to add user accounts to the group. The accounts that you add are said to be group members. You can see what the Members tab looks like in Figure C.


Figure C: The Members tab lists all of the group’s members

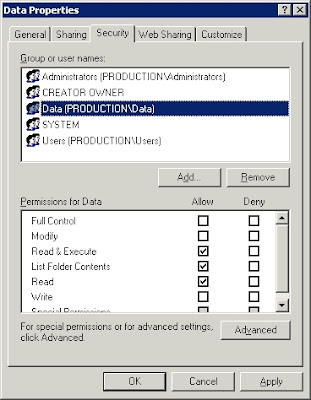
Now it’s time to put the group to work. To do so, right click on the Data folder, and select the Properties command from the resulting shortcut menu. When you do, you will see the folder’s properties sheet. Go to the properties sheet’s Security tab, and click the Add button. When prompted, enter the name of the group that you just created (Data) and click OK. You are now free to establish a set of permissions for the group. Whatever permissions you apply to the group, also apply to group members. As you can see in Figure D, there are some other rights that are applied to the folder by default. It is best to remove the Users group from the access control list to prevent any accidental contradictions of permissions.


Figure D: The Data group is added to the folder’s access control list

Remember earlier when I mentioned how much work it was to try to figure out which users had access to a particular resource? Well, when groups are in use, the process becomes simple. If you need to know which users have access to the folder, just look to see which groups have access to the folder, as shown in Figure D. Once you know which groups can access the folder, determining who has rights to the folder is as simple as checking the group’s membership list (shown in Figure C). Any time additional users need access to the folder, just add their names to the list of group members. Likewise, you can remove permissions to the folder by deleting a user’s name from the list of group members.

Security Groups

The various types of security groups that Windows allows you to create.

In the previous article, I showed you how to create security groups in Windows Server 2003. When I walked you through the process though, you might have noticed that Windows allows you to create a few different types of groups, as shown in Figure A. As you might have guessed, each of these group types has a specific purpose. In this article, I will explain what each type of group is used for.


Figure A: Windows allows you to create a few different types of groups


f you look at the dialog box shown above, you will notice that the Group Scope area provides you with the option of creating a domain local, global, or universal group. There is also a fourth type of group that is not shown here, it is simply called a local group.

Local Groups

Local groups are groups that are specific to individual computer. As you know by now, local computers can contain user accounts that are completely separate from those accounts that belong to the domain that the computer is connected to. These are known as a local user accounts, and they are only accessible from the computer on which they reside. Furthermore, local user accounts can only exist on workstations and on member servers. Domain controllers do not allow for the existence of local user accounts.

With this in mind that should come as no surprise that local groups are simply groups that are specific to a particular member server or workstation. A local group is often used to manage local user accounts. For example, the local Administrators group allows you to designate which users are administrators over the local machine.

Although a local group can only be used to secure resources residing on the local machine, it doesn't mean that the group's membership must be limited to local users. While a local group can, and usually does, contain local users, it can also contain domain users. Furthermore, local groups can also contain other groups that reside at the domain level. For example, you could make a universal group a member of a local group, and the universal group’s members will basically become members of the local group. In fact, a local group can contain local users, domain users, domain local groups, global groups, and universal groups.

There are two caveats that you need to be aware of though. First, as you might have noticed, a local group cannot contain another local group. It would seem that you should be able to drop one group into another, but you can’t. Someone at Microsoft once told me that the reason for this is to prevent a situation in which two local groups become members of each other.

The other caveat that you need to be aware of is that local groups can only contain domain users and domain level groups if the machine containing the local group is a member of the domain. Otherwise, local groups can only contain local users.

Domain Local Groups

Given what you've just learned about local groups, the idea of a domain local group probably sounds contradictory. The reason why domain local groups exist though, is because domain controllers do not contain a local account database. This means that there are no such things as local users or local groups on a domain controller. Even so, domain controllers have local resources that need to be managed. This is where domain local groups come into play.

When you install Windows Server 2003 onto a computer, the machine typically begins life as either a standalone server or as a member server. In either case, local user accounts and local groups are created during the installation process. Now suppose that you wanted to convert the machine into a domain controller. When you run DCPROMO, the local groups and local user accounts are converted into domain local groups and domain user accounts.

It is important to keep in mind that all of the domain controllers within a domain share a common user account database. This means that if you add a user to a domain local group on one domain controller, the user will be a member of that domain local group on every domain controller in the entire domain.

The most important thing to keep in mind about domain local groups is that there are two different types. As I mentioned, when DCPROMO is run, the local groups are converted to domain local groups. Any domain local groups that are created by running DCPROMO are placed into the Builtin folder in the Active Directory Users and Computers console, as shown in Figure B.


Figure B: Domain local groups created by DCPROMO reside in the Builtin container


The reason why this is important to know is because there are some restrictions imposed on these particular domain local groups. These groups cannot be moved or deleted. Likewise, if you cannot make these groups members of other domain local groups.

These restrictions do not apply to domain local groups that you create though. Domain local groups that you create typically began life in the Users container. From there, you are free to move or delete them to your heart’s content.

I have to be perfectly frank and tell you though that in all the years I have been working with Windows Server, I have yet to find a good argument for creating domain local groups. In fact, domain local groups are basically identical to global groups, except that they are restricted to an individual domain.

Global Groups

Global groups are by far the most commonly used type of group. In most cases, a global group simply acts as a collection of Active Directory user accounts. The interesting thing about global groups is that they can be placed inside of each other. You can make one global group a member of another global group, so long as both global groups exist within the same domain.

Keep in mind, the global groups can only contain Active Directory resource. You cannot place a local user account or a local group into a global group. You can however, add a global group to a local group. In fact, doing so is the most common way of granting domain users permissions to resources stored on a local computer. For example, suppose that you wanted to give the managers in your company administrative rights to their workstations (not that I recommend doing that, this is just an example). To do so, you could create a global group called Managers, and place each of the manager’s domain user accounts into it. You could then add the Managers group to the workstation’s local Administrators group, thus making the managers administrators on those workstations.